Modders Guide
Mod Structure
Star Control: Origins (SCO) mods are contained in the ../My Games/Star Control/Universes/ directory.
To start one create a directory in this structure.

This new mod directory mirrors the Assets directory used by the main game. And most of the games assets and definitions are exposed to xml and csv files in this structure to make it easy for modders to add and modify content. If you look through the main games asset directory you can get a feel for the wide variety of options that are exposed and moddable. This document will not go through all of them, it will show examples that will allow you to make your own changes.
The Manifest File
In that directory you will need to create a manifest file. The purpose of this file is to define what the Mod is.
That filename should be [Mod Name].manifest_xml
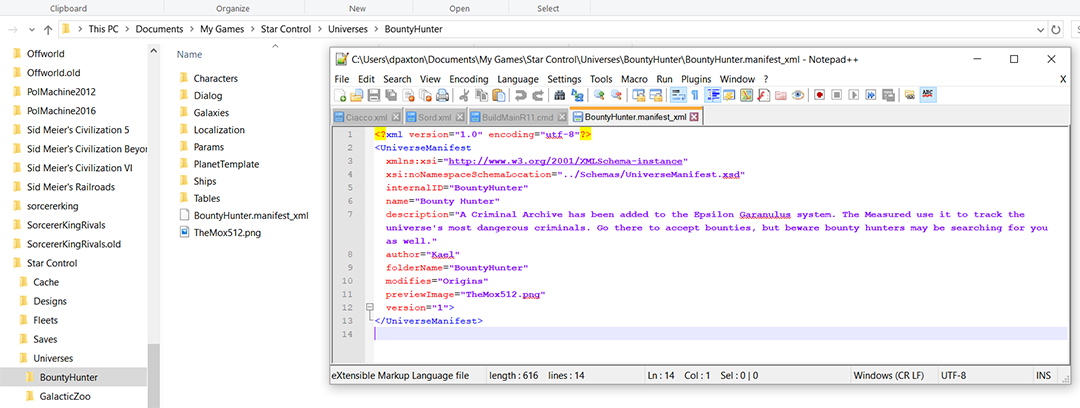
- internalID- This is the name that is used if the mod is referenced by other mods. For example, if you build a Lovecraft themed mod someone else may want to add a few quests to it. They would do that by referencing this name.
- name- This is the displayed name of your mod in the game UI and Steam Workshop.
- description- This is the description of your mod used in the steam store. If you fill it in here you won't have to retype it every time you update your mod.
- author- This should be your name.
- folderName- This is the name of the folder that you created in the Universes directory.
- modifies- This will typically always be "Origins" (to mod the base game). But if you are modding someone elses mod you would put their internalID here.
- version- Use this to help track the version of the mod your players may be using.
With a new directory, and a manifest file you have made your very first Star Control: Origins mod. But it doesn't do anything yet. The next step is adding content.
Note: Your mod will not show up in Star Control's Multiverse screen until you've added content.
Adding Content
Adding content is fairly straight forward. Look in the main game directories at all the XML and CSV files and copy the structure under the Asset directory (so if the XML file is in the \Assets\Characters directory create a new \[Mod Directory]\Characters directory. Then add a new file with the same format for the new entries you want. Content, by default, is appended between the main game and mods so you can easily add new planets, solar systems, characters, ships, etc to the game.
Example: Adding a Ship - The Lander Tank (part 1)
In the Bounty Hunter mod, one of the bounties you are sent out to collect is for a crazy Drenkin who built a warship that is to heavy to get off of the planet. Now he just flies it around the planet destroying anything in his path. I call it the Lander Tank.
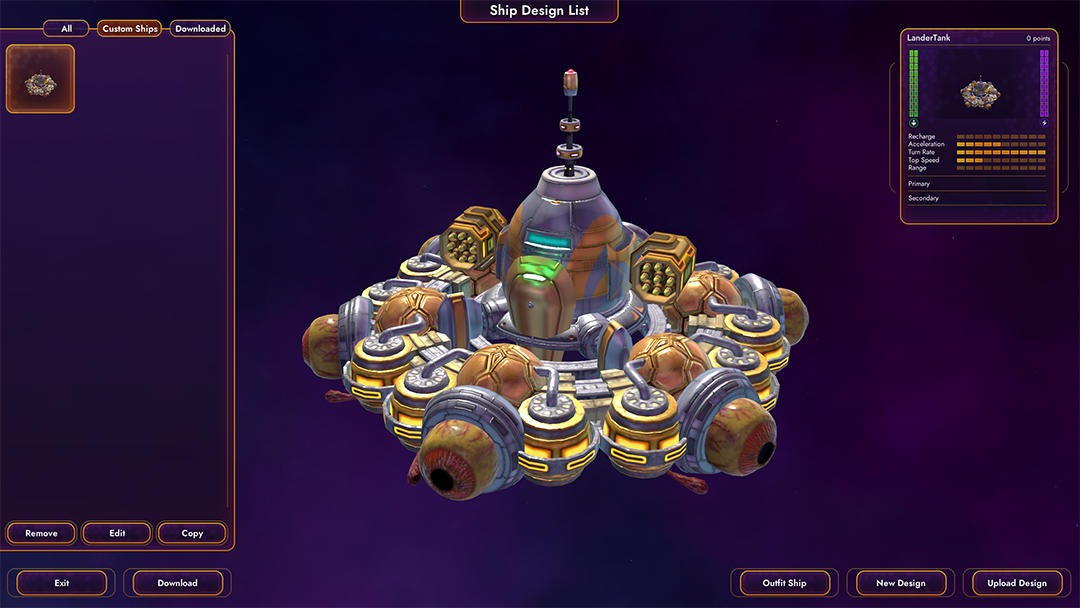
The first step is the most fun. We have to make a crazy tank in the games ship designer. This is what I came up with:
When you save these ship designs they are copied out to your ../My Games/Star Control/Designs/ directory. There will be three files, a png file (a picture of your ship), the scdesign file (the actual exported model), and a ShipXML file (which has the ships stats in it). Take all three files and put them in your mod's Ship directory. Go ahead and edit the ShipXML for whatever stats you would like it to have, the weapons you want it to use, etc. There are lots of parameters to tweak and hundreds of ships in SCO that you can use as examples.
With that done, you have added a ship to the game. But there is one giant problem. It doesn't show up anywhere. There isn't any in the universe, there is no way to get one, nothing. So we need more than just adding an asset to the game, we need the game to refer to it somewhere.
Since we want this ship to show up on a planet we want it to behave like a critter. So we will need to add a new critter to the game.
Example: Adding a Critter - The Lander Tank (part 2)
Critters are defined in the main games \Assets\Tables\Critters.csv file. CSV's are a different format than the xml used in most other places (I tried asking the developers about this, but they just grumbled at me). They are a little easier to read in Excel, and a bit more difficult to read in text editors like notepad++, but still easily moddable.
CSV files have a top line that defines what all the comma separated values are. Your mod needs that line and then lines for whatever content you are adding.
This is the CSV definition line for the Critters.csv file (shown in Excel):
The above line is just a copy from one of the drone critters that already exists in the game except we have switch the assetID to "LanderTank" (that's a ship design) and changed some of the values for health, wanderSpeed, etc.
Notice that we create a ship with the ship maker and now we are using that ship as a critter. Beneath the scenes ship designs can be used for many things. We can build immobile star bases, critters, buildings, things floating in space, weird things on planets. All as ship designs.
Now we have a new ship design, and a new critter that uses it. But it still doesn't show up anywhere in the game. There isn't any planet anywhere that has this new Lander Tank critter on it. to do that we are going to have to add a new planet template to the game.
Example: Adding a Planet template - The Lander Tank (part 3)
SCO's lead designer (Brad) had a lot of fun with planet templates. There are over 200 of them in SCO. Planet templates control just about every aspect of a planet, form the lighting and textures used, to the resources that are found there, to the critters and environmental hazards that are on them. Because we have so many planet templates and they may share some common features they are able to inherit from each other. So if a designer wants to create a new type of Green planet with more dangerous critters on it he can set it to inherit everything form Green and just change the critter definition. That way if we tweak the lighting or textures on the Green planet all the planet like it will get those changes.
This also means that when we add a new planet template with our mod (which we want to do to add the new Lander Tank critter on it) we can use inheritance to make it a very simple process.
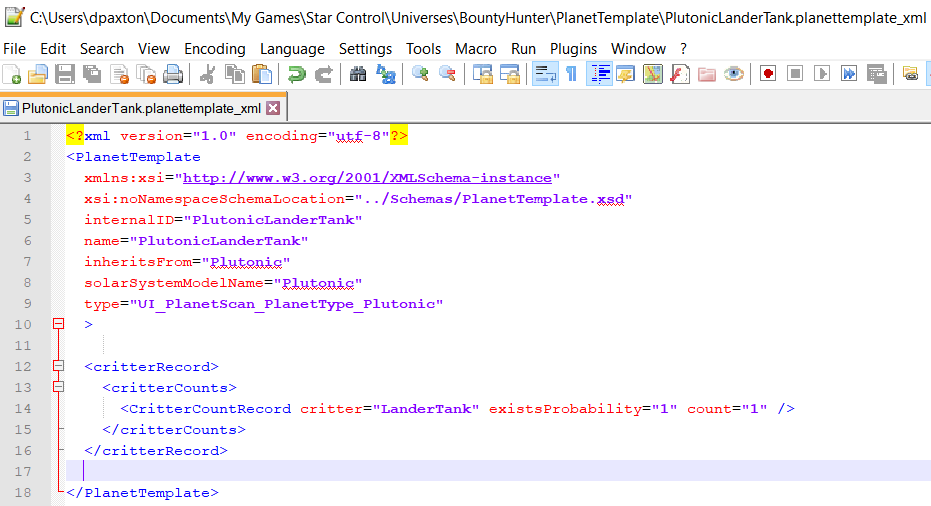
This new planet template type inherits from Plutonic planets and its only change is that it adds the LanderTank critter that from the last step.
So now we have added a ship design, we have created a critter that uses that design, we have added a planet template that has that critter. But we still don't have anything in the game because no existing planet uses this new planet template. Our last step it to modify the galaxy file so that a planet in the SCO universe uses our new planet template.
Modifying Existing Content
Outside of adding new content with your mod, you may also want to modify existing content. When we do this we need to specify exactly what asset our mod is changing and supply the new values. To decrease the chance that we will conflict with another mod, we will want to specify only the specific changes we want. That way one mod can change the camera view in melee combat, while another changes the damage from crashing into a planet, and another changes lighting. Of course if two mods both change the damage from crashing into a planet, there will be a conflict but by minimizing our change we may conflicts less likely.
Example: Changing a Planet Template - The Lander Tank (part 4)
In the Bounty Hunter mod I change two of the existing planets in SCO to a new planet template. I switch one to an existing template (PlutonicDronesHard) and another to a new planet template provided by the mod (PlutonicLanderTank).
Looking through the game files I see that there is a ..\Assets\Galaxies\StarControlGalaxy.xml file. This file has the definitions for all the games stars, planets and moons. We have already covered how we would add new content to this structure, but in this example we want to modify some existing entries.
To do that, create a Galaxies directory (mirror the structure used by the main game) in our mod directory (..\Universes\BountyHunter\Galaxies\) and in that directory create a StarControlGalaxy.xml file (same name as the file for the main game). The following is the file that would change those planet types:
There are a few key differences between this and content we are adding. Note that we have to specify the internal name of the asset we are changing at each level. So at the Galaxy level we specify intenralID="Origins_Origins" (we get that name from the main game StarControlGalaxy.xml file where it is specified. We also add a append="true" to that line to tell the game that we are modifying an existing asset.
After that the change is simple. Because the planets we are changing are nested in a solar system we need to specify the solar system using the internal name that it has in the main game file, and then specify the planet we are modifying by the internal name. If we were modifying a moon we would have an additional layer to get to the moon.
Note that the only thing we change about the planet is the one thing we want to change. We could copy all the information if we wanted but it makes our mod more likely to conflict with other mods and makes it more difficult to track what we have actually changed. Anything we don't include here will keep the valued assigned by the main game.
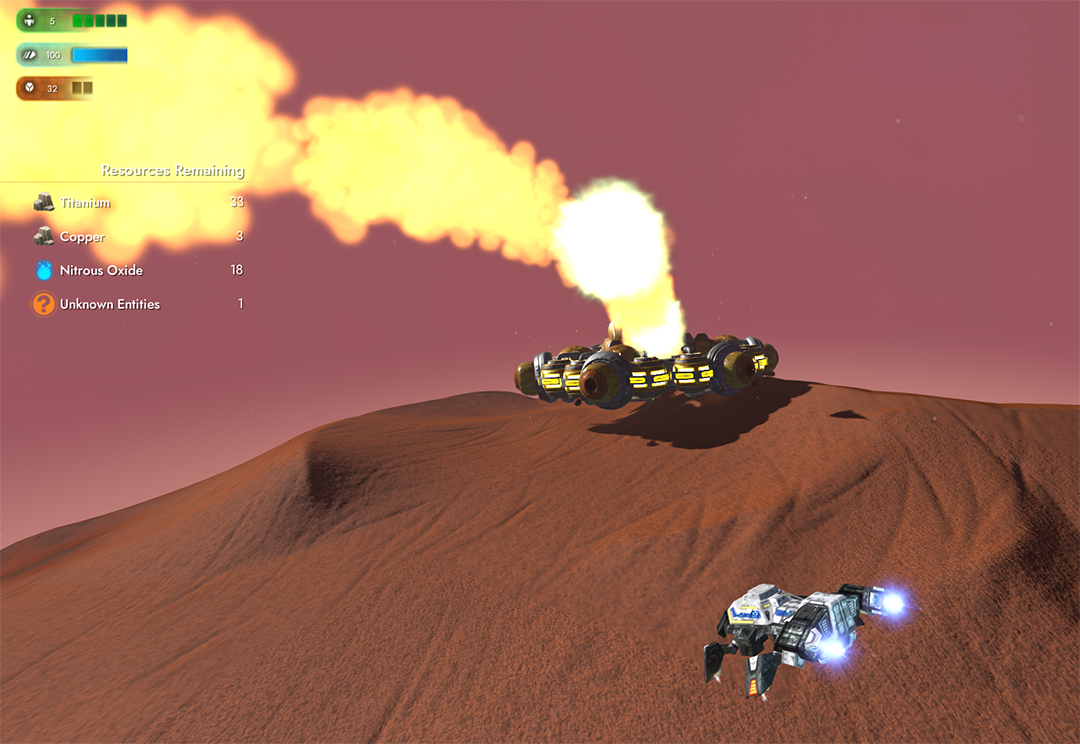
Now we can finally go to that planet and checkout our Lander Tank.
Example: Changing Game Parameters
Some of the most interesting files to mod are the parameter files. These are located in the base \Assets\ directory. In particular gameparameters.xml, meleeparameters.xml, planetparameters.xml and roverparameters.xml have thousands of options you can play with. These are the direct options the game designers used to tweak the game, and weren't designed just for modding. Because of that some of the options may be deprecated (may not do anything), and many may be poorly named. But they are open for you to play with.
Note: the parameter files break the "mirror the directory structure of the main game" rule we use everywhere else. Instead of being in the base directory like they are for the main game they need to be put in a "Params" directory for your mod.
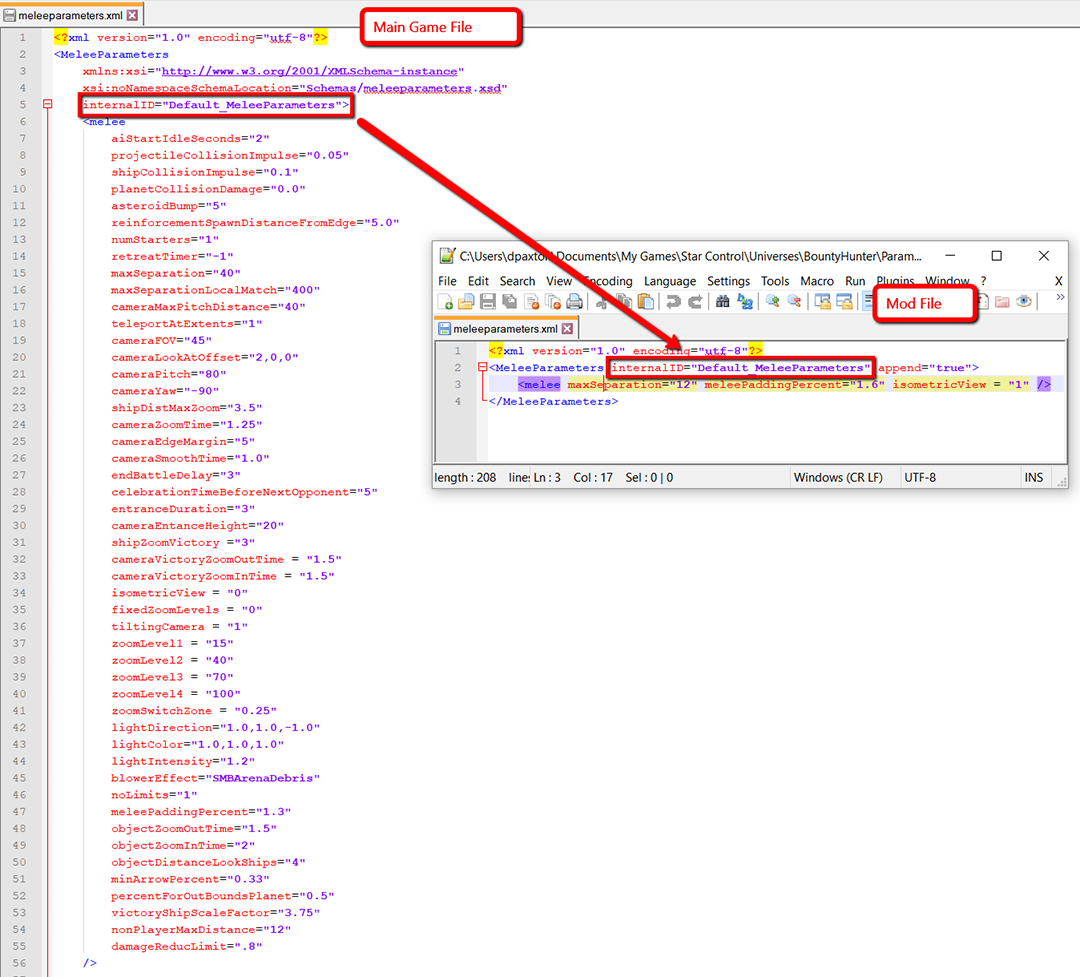
These are the parameters from the melee section of the meleeparameters.xml file. The file has other sections for asteroids, asteroid belt, death ring, opponent types, wormholes, ion storms, pickups and more.
For this example we are going to make three changes to the melee camera so that I can get a better look at the cool ships in SCO. Those changes are:
- Change maxSeparation from 40 to 12. This is how far apart the ships are allowed to be until the other ship goes off screen. At 40 the camera goes further back, but because of that the ships get very small. At 12 the ships stay large (but you will also have the other ship off screen a lot more).
- Change meleePaddingPercent from 1.3 to 1.6. This is the amount of padding the melee puts around the edge. In other words between as close as your ship can get to the edge of the screen. I like it a bit higher so I don't get surprised by things coming at me from the edge as frequently.
- Change isometricView from 0 to 1. This enables isometric view, so you see all the ships from a 3/4 view instead of top down.
Note that in the above we had to specify the internal name of the object we were modifying ("Default_MeleeParameters") and we got that name from the main games meleeparameters.xml file. After that, all the rules we learned in the preceding section apply. Make sure we have append="true" and only include the changes we want to make.
With those changes we we fight in melee we now have a closer camera and we see our ships in 3/4 view.
Creating a new Character
Coming Soon
Creating a Quest
Coming Soon
Uploading a Mod
Coming Soon
